08. Hints
KUKA Project Hints!!!
There are two main differences between classic path planning algorithms that you’ve learned earlier and the path planning algorithm that you’ll have to write in the KUKA project
- Classic path planning algorithms assume a known map where the position of obstacles and free spaces are known. However, in the KUKA project the maze is unknown! The only information you have is the map dimensions, start pose, and goal pose.
- Classic path planning algorithms applied earlier assume a change in position only. The orientation angle of the robot is kept fixed. With the KUKA project, however, you need to change both the position of the gripper and its orientation to move anywhere inside the maze.
Applying what you learned earlier about classic path planning algorithms to the KUKA project
- Since the maze is unknown, you have to implement "a search as you go" technique. Using the map dimensions you can represent the maze in a matrix form. Begin searching from the start pose, identifying if a cell is free or occupied, and as you're searching update the matrix until you reach the goal pose.
- Define a set of angles that enables you to move anywhere inside the maze. To update the status (occupied or free) of a cell in the matrix, you can change the orientation angle of your gripper and check if you're able to move with each of the predefined angles towards the cell. The cell will be updated as free if any of the predefined angles returns a valid response. On the contrary, the cell will be updated as occupied if all the predefined angles return an invalid response.
Visual Example
This is an example of how you can represent
Maze 1
practice phase in a matrix form. As a reminder, this is
Maze 1
start and goal configuration:
<!-- Start 2D pose  -->
  <arg name="start_pos_x" default="0.38" />
  <arg name="start_pos_y" default="0.0" />
  <arg name="start_pos_theta" default="0.0" />
  <!-- Goal 2D pose  -->
  <arg name="goal_pos_x" default="-0.37" />
  <arg name="goal_pos_y" default="0.5" />
<arg name="goal_pos_theta" default="0.0" />- Transforming the maze (1.2mx1.6m) into a matrix size (12x16) . I am using a very small resolution here for demonstration. You need to test which resolution works best for you.
-
Transforming
Maze 1start and goal poses to matrix coordinates:- Start pose (0.38, 0, 0) to matrix coordinate (9, 8, 0)
- Goal pose (-0.37, 0.5, 0) to matrix coordinate (2, 13, 0)
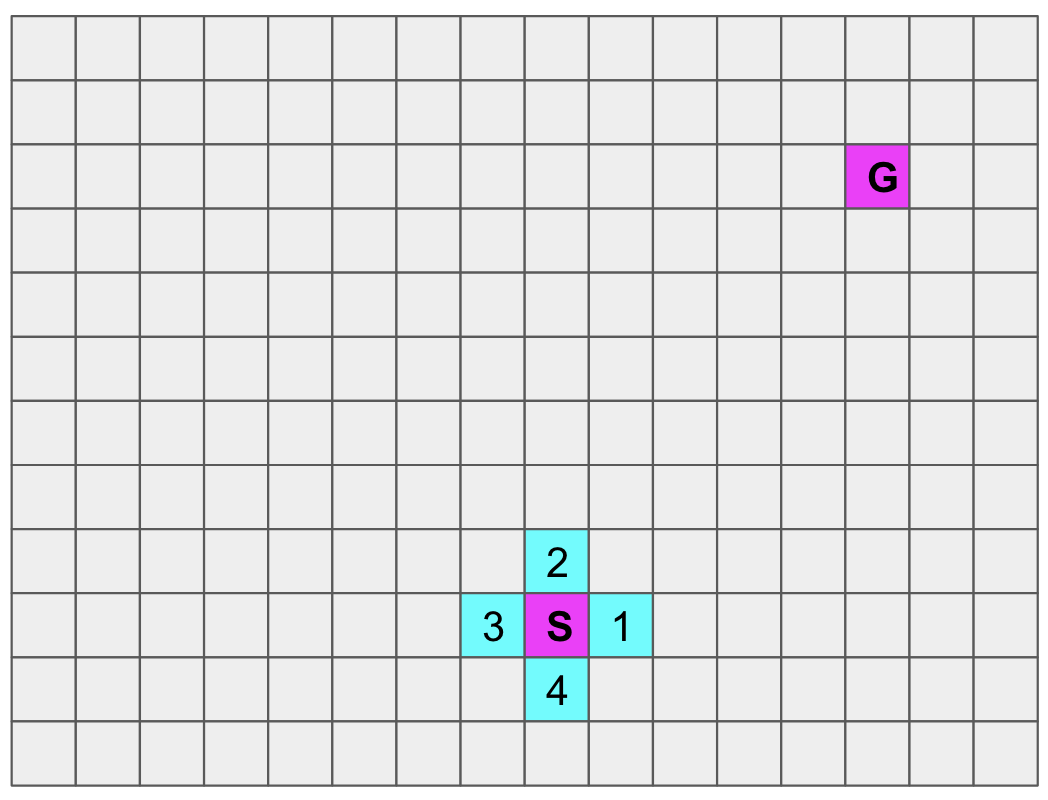
Now that you’ve transformed world coordinates into matrix ones, implement a search as you go technique where you start with the S cell and then update the status of adjacent cells.
Updating the status of adjacent Cell 1 :
Defining a set of angles in radians to navigate the maze: [0, 0.78, 1.57]
- (9, 8,0) to (9,9,0) Valid or Invalid?
- (9, 8,0) to (9,9,0.78) Valid or Invalid
- (9, 8,0) to (9,9,1.57) Valid or Invalid?
Cell 1 will be considered as occupied if all these questions return an invalid answer!
Now, move on to the second adjacent cell, check for movement with different angles, and update your matrix. Then, move to another undiscovered cell and so on until you build a map and reach the goal G .
How to start searching and planning?
As a good start, solve an easy problem where both the start pose and goal pose are on the same line. Search your way toward the goal by keeping the angle of your gripper constant. Once you solve this problem, assign a set of angles to each direction of movement as you’ve seen in the earlier visual example.

Discovering if cells 1 to 4 are occupied or free by keeping the gripper angle constant:
- Cell 1 - (9, 8,0) to (9,9,0) Valid or Invalid?
- Cell 2 - (9, 8,0) to (8,8,0) Valid or Invalid?
- Cell 3 - (9, 8,0) to (9, 7,0) Valid or Invalid?
- Cell 4 - (9, 8,0) to (10,8,0) Valid or Invalid?